Stone Sculpture Projects |


 Colorado Prospector - Gem and mineral prospecting and mining forums > Prospecting, Mineral Collecting and Treasure Hunting Forums > Gem and Mineral Specimen Finds or Processes
  |
Stone Sculpture Projects |
 Nov 26 2012, 07:01 AM Nov 26 2012, 07:01 AM
Post
#76
|
|
 Moderator  Group: Members Posts: 4,459 Joined: 25-August 09 From: way on up thar Member No.: 6,983 |
The bird sculpture is such a cool project!
Very good sculpting so far Denise and I'm anxious to see how you work the bird's head and attach it. Keep up the great work! -------------------- /l ,[____], l---L-OlllllllO- ()_) ()_)--o-)_) BLACK SANDS MATTER! Very Happy CP Lifetime Member CP CORE TEAM Referral Code CE213 |
 |
 
|
|
Nov 26 2012, 01:10 PM
Post
#77
|
||
 Master Mucker! Group: Admin Posts: 7,190 Joined: 7-October 03 From: Colorado Member No.: 4 |
Thanks for the compliments guys! So far it looks more like those mass produced rock sculptings right now, but as the project comes along all the rough lines will be smoothed out giving it a softer look and not so blocky.
QUOTE Very good sculpting so far Denise and I'm anxious to see how you work the bird's head and attach it.  That will be easy Chris. I will just have to take a wider shot of it like this. That will be easy Chris. I will just have to take a wider shot of it like this.  It is made from one solid piece of Colorado Amazonite. It is made from one solid piece of Colorado Amazonite.
 I am thinking for the eyes, I will use either small diamonds or smokey quartz chips. We were thinking it would be really cool to have her sitting on Smokey Quartz eggs nestled in between some Amazonite and smokey Quartz crystals. I am thinking for the eyes, I will use either small diamonds or smokey quartz chips. We were thinking it would be really cool to have her sitting on Smokey Quartz eggs nestled in between some Amazonite and smokey Quartz crystals. 
-------------------- Education is the key to the future,
and participation opens the door to opportunity. Discover your prospecting independence & success! ColoradoProspector.com Owner/Webmaster Core team member ♥  |
|
|
|
|
|
|
Nov 26 2012, 02:53 PM
Post
#78
|
|
|
Moderator Group: Members Posts: 4,459 Joined: 25-August 09 From: way on up thar Member No.: 6,983 |
Now I see, I was looking at it upside-down. That is definitely going to be a beauty!
A bird in the hand..... -------------------- /l ,[____], l---L-OlllllllO- ()_) ()_)--o-)_) BLACK SANDS MATTER! Very Happy CP Lifetime Member CP CORE TEAM Referral Code CE213 |
|
|
|
|
Nov 26 2012, 07:31 PM
Post
#79
|
|
|
russau Group: Members Posts: 2,841 Joined: 4-December 03 From: st.louis missouri Member No.: 43 |
thats turning into a tweet stone sculptured bird!:)
|
|
|
|
|
Nov 27 2012, 09:34 PM
Post
#80
|
|
|
Master Mucker! Group: Admin Posts: 7,190 Joined: 7-October 03 From: Colorado Member No.: 4 |
QUOTE (swizz @ Nov 26 2012, 01:53 PM)  A bird in the hand..... Is worth two in the bush!   Haha Russ, it will be a real tweet to finally have it finished. Haha Russ, it will be a real tweet to finally have it finished. It's coming along nicely, just roughing in the lines deep enough to remain when polished out. Almost done roughing in the rest of the wings. -------------------- Education is the key to the future,
and participation opens the door to opportunity. Discover your prospecting independence & success! ColoradoProspector.com Owner/Webmaster Core team member ♥ |
|
|
|
|
Nov 28 2012, 05:06 PM
Post
#81
|
||
|
Master Mucker! Group: Admin Posts: 7,190 Joined: 7-October 03 From: Colorado Member No.: 4 |
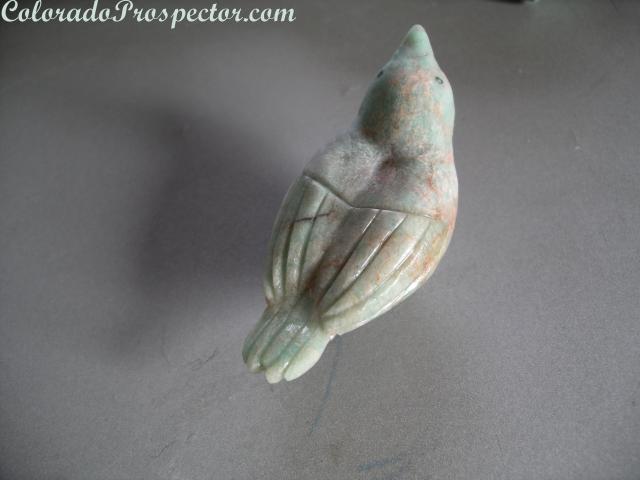
I was noticing that the last picture didn't show very good detail, so here is another picture with more progress. I really like this angle of it, you can even see where the eyes are going to go.
 Dan even told me he has two small matching Diamonds I could use for it if I wanted! Dan even told me he has two small matching Diamonds I could use for it if I wanted!  Now for the smaller feathers twards the top of the wings. 
-------------------- Education is the key to the future,
and participation opens the door to opportunity. Discover your prospecting independence & success! ColoradoProspector.com Owner/Webmaster Core team member ♥ |
|
|
|
|
|
|
Nov 29 2012, 08:28 PM
Post
#82
|
|
|
russau Group: Members Posts: 2,841 Joined: 4-December 03 From: st.louis missouri Member No.: 43 |
you have a good eye for this! really nice!
|
|
|
|
|
Nov 30 2012, 12:09 PM
Post
#83
|
||
|
Master Mucker! Group: Admin Posts: 7,190 Joined: 7-October 03 From: Colorado Member No.: 4 |
Thanks Russ!
I'm still learning with every step but that is one of the fun parts of it. Dan keeps telling me I should be using the Dremel with the flex shaft for the more detailed work, but one slip with that and the mistake is alot deeper than it is with the hand files. The slip factor when starting a mark in the stone is a big pain. Looks like chicken scratch till I work the mark in deep enough. I have also been using a little leather piece to ride the blade against instead of my finger.  Here is a picture of the hand files, little diamonds and the Dremel burr that I will use to make the holes for it's eyes. Just a piece of the tip will be needed to accomplish that for the eyes to sit in. We will clean the Diamonds up and get closer pictures later.
So far so good. Lots of fine tuning still yet before I move on to polishing it out. We are still looking through our collection for a specimen (base) of smokey Quartz crystals for the bird to nest in. Still rolling around ideas for what might look best, so any ideas or suggestions are welcome. -------------------- Education is the key to the future,
and participation opens the door to opportunity. Discover your prospecting independence & success! ColoradoProspector.com Owner/Webmaster Core team member ♥ |
|
|
|
|
|
|
Jan 10 2013, 09:28 AM
Post
#84
|
||
|
Master Mucker! Group: Admin Posts: 7,190 Joined: 7-October 03 From: Colorado Member No.: 4 |
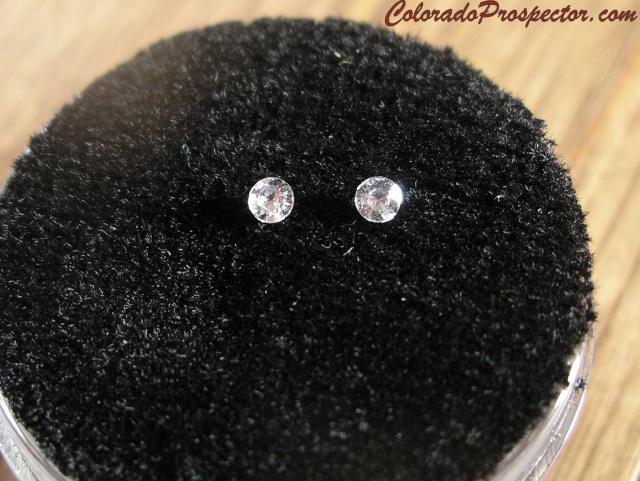
Here is that closer picture of the little Diamonds cleaned up that will be used for the birds eyes.
With the close up picture, I can see they still need a little more cleaning.......hard though with such small stones.
Attached thumbnail(s)
-------------------- Education is the key to the future,
and participation opens the door to opportunity. Discover your prospecting independence & success! ColoradoProspector.com Owner/Webmaster Core team member ♥ |
|
|
|
|
|
|
Jan 10 2013, 06:08 PM
Post
#85
|
|
|
Moderator Group: Members Posts: 4,459 Joined: 25-August 09 From: way on up thar Member No.: 6,983 |
Absolutely beautiful work Denise. MUCH talent there. The last pic of the bird really gives a good perspective... sculpting in general is not easy, let alone with stone.
I can't wait to see the finished product! Great work! 
-------------------- /l ,[____], l---L-OlllllllO- ()_) ()_)--o-)_) BLACK SANDS MATTER! Very Happy CP Lifetime Member CP CORE TEAM Referral Code CE213 |
|
|
|
|
Jan 17 2013, 02:40 PM
Post
#86
|
|
|
Shovel Buster! Group: Members Posts: 60 Joined: 4-October 10 From: Sweden Member No.: 7,387 |
I to love the photos Denise. Great talent.
Also trying to teach myself carving, however on a more free-form basis. These are sorta "in action" shots, documenting the process of carving a garnet using a dremel and different kind of bits and grinding media. The rough; a close to 16+ cts colour shifting garnet in a difficult-to-facet shape. Would have a low return. So why not try carving it instead? [img width=100 height=99]http://i1209.photobucket.com/albums/cc389/Voltaire_Lapidary/Carving/th_032.jpg[/img] [img width=87 height=100]http://i1209.photobucket.com/albums/cc389/Voltaire_Lapidary/Carving/th_031.jpg[/img] I do some rough grinding at 600 grit with sintered burrs, variety "el cheapo" from China. Then I use 600 diamond paste (homebrew variety) and a tooth pick (special burr) to level out the bumps and generally round it off. Also gives a finer finish before moving on to pre-polish. The first side is completely free form. Notice the black pencil drawings. Using it to mark areas which need more cutting. The second side looks like a mushroom growing out of the bush, IMO. [img width=97 height=100]http://i1209.photobucket.com/albums/cc389/Voltaire_Lapidary/Carving/th_045.jpg[/img] [img width=100 height=95]http://i1209.photobucket.com/albums/cc389/Voltaire_Lapidary/Carving/th_046.jpg[/img] I've now moved to the next step, pre-polish. I started out using 3,000 grit, but it took to long. So once again a home brew cutting paste was made using 1200 grit diamond. (6-12 micron) It took on an polished surface using that! I couldn't get a decent picture of the other side before finishing. Tried using a final polish of 14,000 grit, didn't do any difference so I let it be. [img width=100 height=91]http://i1209.photobucket.com/albums/cc389/Voltaire_Lapidary/Carving/th_cabbingdays017.jpg[/img] This piece ended up at approx 18 mm long and 13.86 cts heavy(!!). I hope this works, finished piece. Looks worse then it is. Should've cleaned it before taking pics [img width=100 height=95]http://i1209.photobucket.com/albums/cc389/Voltaire_Lapidary/Carving/th_finished004.jpg[/img] [img width=100 height=95]http://i1209.photobucket.com/albums/cc389/Voltaire_Lapidary/Carving/th_finished001.jpg[/img] -------------------- Geologists are gneiss, tuff and a little wacke.
|
|
|
|
|
Jan 18 2013, 08:52 PM
Post
#87
|
|
|
Master Mucker! Group: Admin Posts: 7,190 Joined: 7-October 03 From: Colorado Member No.: 4 |
Sweet Garnet Voltaire, nice work! I can see the mushroom growing out of a bush as you see, but at another angle it looks like a tiny frog from the rain forest.
 Never thought of using a toothpick with grits for the finer detail, interesting idea. Looks great, keep up the good work and thanks for sharing pictures and techniques with us! Never thought of using a toothpick with grits for the finer detail, interesting idea. Looks great, keep up the good work and thanks for sharing pictures and techniques with us!
-------------------- Education is the key to the future,
and participation opens the door to opportunity. Discover your prospecting independence & success! ColoradoProspector.com Owner/Webmaster Core team member ♥ |
|
|
|
|
Jan 20 2013, 01:16 PM
Post
#88
|
|
|
Shovel Buster! Group: Members Posts: 60 Joined: 4-October 10 From: Sweden Member No.: 7,387 |
I actually came upon the idea with toothpicks out of shear need.
Didn't find anything else suitable for applying nor working the grit with.  Now I've carved some larger sticks from wood to work larger areas more quickly. Hope to see some more work from yours soon! -------------------- Geologists are gneiss, tuff and a little wacke.
|
|
|
|
|
Jan 21 2013, 07:30 AM
Post
#89
|
||
|
Master Mucker! Group: Admin Posts: 7,190 Joined: 7-October 03 From: Colorado Member No.: 4 |
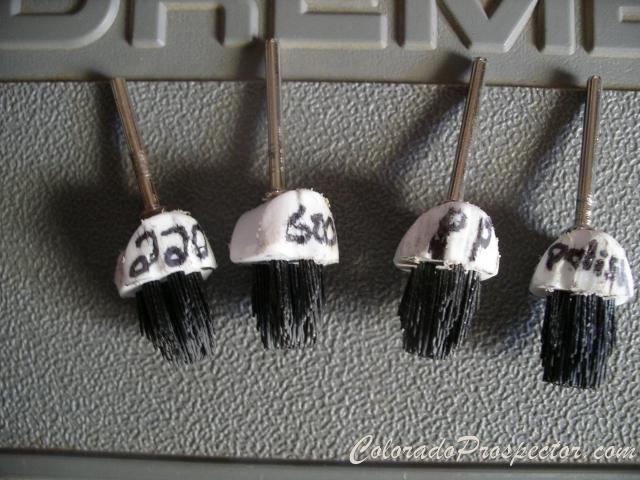
I ran into the same problem when sculpting. The diamond hand files and wet/dry sandpaper helps, but there was still something missing for fine detail. Dan made me a set of dremel bits from a rough bristled brush cut into pieces. I can then apply the grit to them and work the stone. They work good! I used them to polish out the relief carving of the butterfly in the Thunderegg. Here is a picture of the brushed CP made for me..... I also made an Opal teardrop with just wet/dry sandpaper and polish grit all by hand yesterday. Turned out great!
Attached thumbnail(s)
-------------------- Education is the key to the future,
and participation opens the door to opportunity. Discover your prospecting independence & success! ColoradoProspector.com Owner/Webmaster Core team member ♥ |
|
|
|
|
|
|
Aug 31 2013, 08:54 AM
Post
#90
|
|||
|
Master Mucker! Group: Admin Posts: 7,190 Joined: 7-October 03 From: Colorado Member No.: 4 |
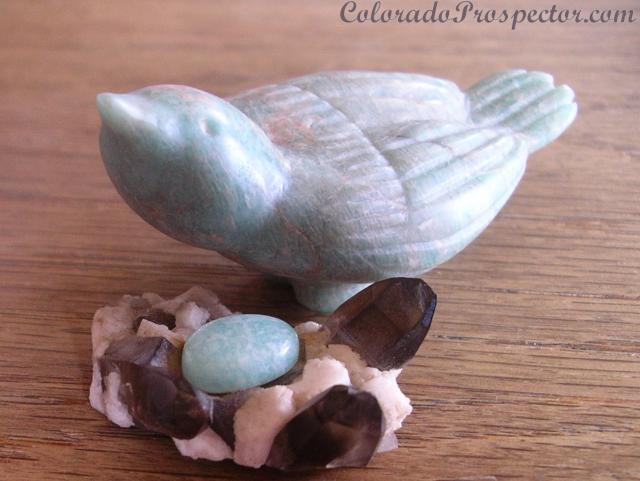
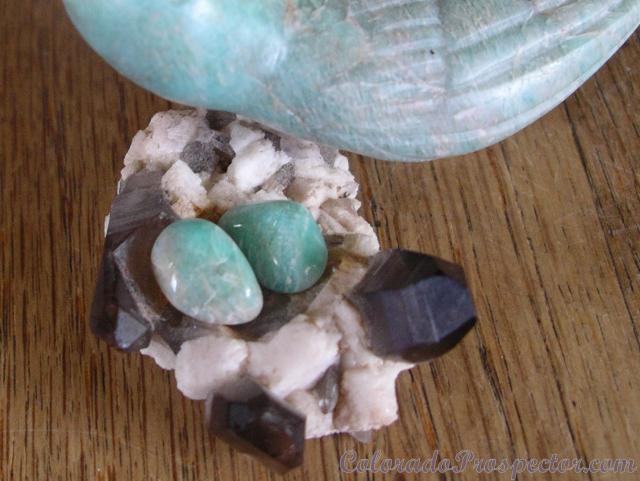
Thanks for the toothpick tip Voltaire! I have used it with grit on direct spots that were giving me difficulties and it works great! I found the toothpick broken works best for working the grit. Smooth sides of the toothpick just rubs it off. Bird is on the pre polish stage now so it's coming along nicely. Once polished, I will add the Diamonds for the eyes. Now to figure out a base for it.
Here is one idea with a nest and an egg.....hehe....Maybe set these in a nice wood base for display?
![confused0082[1].gif](style_emoticons/default/confused0082[1].gif) Or maybe two smaller eggs for the nest? Or maybe two smaller eggs for the nest?
-------------------- Education is the key to the future,
and participation opens the door to opportunity. Discover your prospecting independence & success! ColoradoProspector.com Owner/Webmaster Core team member ♥ |
||
|
|
|
||
|
| Lo-Fi Version | Time is now: 26th June 2024 - 10:02 PM |